Maildoso: What It Is, How It Works, and How to Get Started
Outbound helps businesses find new customers through email campaigns, cold calls, and LinkedIn outreach. To launch an email campaign, you need to buy domains, set up email accounts, warm them up, build a list of potential customers, and verify their email addresses.
Maildoso makes the first step quick and easy by letting you register domains and set up email accounts. In this article, we’ll look at the problems the service solves and walk you through how to get started with Maildoso.
Key Takeaways
- Maildoso is a platform where you can purchase domains and create email accounts for cold email campaigns.
- Key features include automatic IP rotation, self-healing to restore problematic mailboxes, and monitoring of email warm-up and deliverability.
- Mailbox pricing ranges from $0.49 to $2.80 per mailbox, and you can start with as few as 10. Example plans: 30 mailboxes for $75/month, 300 for $225/month, and 1,000 for $499/month. Domains are billed separately at $15 per domain per year – or you can connect your own.
- Before you buy, you can test up to 300 mailboxes free for 30 days.
Cold Email Outreach: How It Works in Outbound
Outbound is a way to find potential customers by reaching out first to people who aren’t yet familiar with your company – through cold email campaigns, cold calls, or LinkedIn outreach. With email, you can connect with many relevant prospects at once instead of contacting each person individually.
To launch a cold email campaign, you need to:
Set up your email infrastructure by registering domains and creating email accounts. Find leads and verify their email addresses. Launch a campaign using an email outreach tool (sequencer) that automatically sends a sequence of emails on a schedule.
Specialized tools fit every stage. For example, you can find leads with Apollo, set up domains and email accounts with Maildoso, then connect your mailboxes to Instantly and launch your campaign. Each tool has alternatives, so choose the ones that best suit your needs.
Maildoso: A Step-by-Step Guide
Maildoso offers SMTP mailboxes hosted on the platform’s own servers and IP addresses. You can export these mailboxes and connect them to the email outreach tool that does the sending. The platform suits B2B companies and lead generation agencies that send large volumes of emails to prospects in the US and EU.
Getting started is straightforward. Let’s walk through it step by step – from signing up and setting up domains and email accounts to getting your mailboxes ready for your first campaign.
Step 1. Choose a Plan and Purchase Mailboxes
-
First, figure out how many domains and mailboxes you need. Divide the number of emails you plan to send per day by 15 – we recommend no more than 15 emails per mailbox per day. That gives you the number of mailboxes. Then divide that by 5 to get the number of domains, since we recommend 5 mailboxes per domain.
Example: Say you want to send 300 emails per day. 300 ÷ 15 = 20 mailboxes. 20 ÷ 5 = 4 domains.
Maildoso’s plans are among the most affordable SMTP options on the market – mailboxes cost up to 8 times less than Google Workspace accounts bought through resellers. Each mailbox costs between $0.49 and $2.80 per month, with a minimum purchase of 10. The more you buy, the less you pay per mailbox. For example, 30 mailboxes cost $75 per month ($2.50 each), 300 mailboxes cost $225 per month ($0.75 each), and 1,000 mailboxes cost $499 per month ($0.49 each).
-
Pick a plan on the pricing page, or buy any number of mailboxes directly on the platform, starting from 10.
Step 2. Register Your Domains
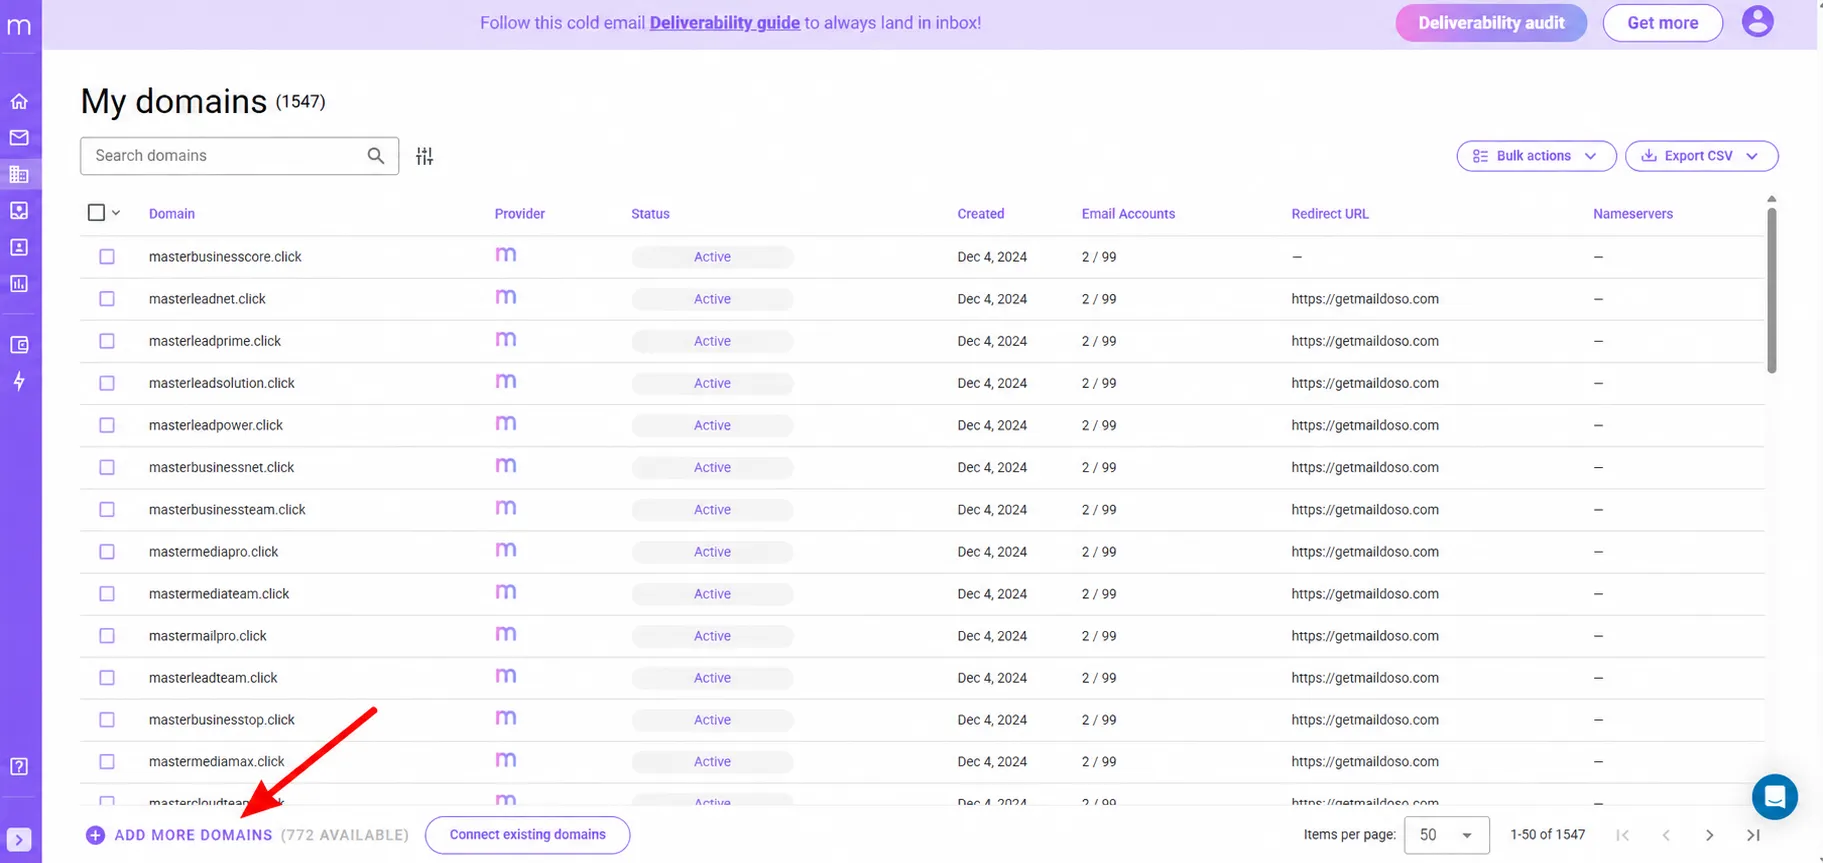
- Domains on Maildoso are sold separately at $15 per domain per year. You can also connect domains you already own. To buy new ones, pay for your mailboxes first, then log in by clicking Log in in the top-right corner of the page.
- Click Get more in the top navigation bar to open the Packages & Add-ons section. Select the number of domains you need, then complete payment.
- To register your purchased domains, scroll down to the Domains section and click Add more domains. If you already own domains, connect them in the same section by clicking Connect existing domains and following the on-screen instructions.
- To find suitable names, enter keywords in the Enter your domains field. Maildoso will suggest available options, including exact matches and similar names. Pick the ones that fit your brand.
- Next, set up domain redirects by entering your website’s main URL. That way, if someone types a domain from your email into their browser, they’ll land on your company’s website.
Why bother with separate domains? They protect your primary website: if recipients report your cold emails as spam, it won’t hurt the reputation of your main domain or your business email accounts. Learn more in the FAQ.
- Finally, enter the personal information required to purchase the domains.
Activation takes just a few minutes. Maildoso automatically configures SPF, DKIM, and DMARC records, which help authenticate your emails and verify your sender identity – no manual setup needed.
Step 3. Create and Connect Your Mailboxes
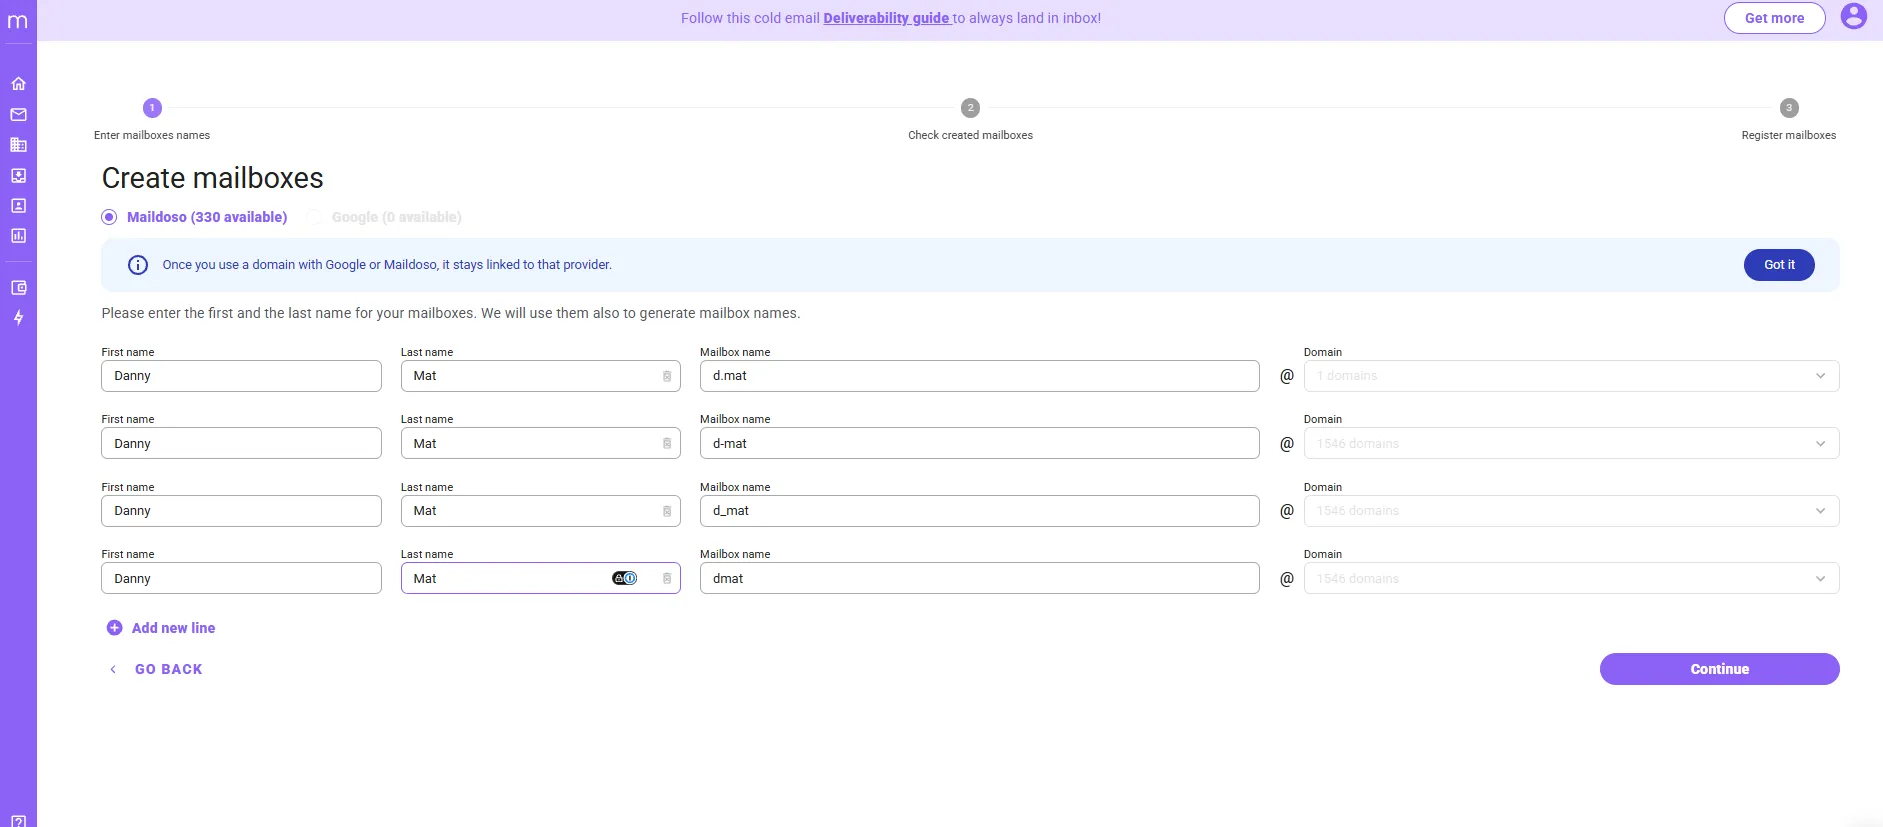
- Once your domain status changes to Ready, you can start creating email accounts. Go to My email accounts and click Add more email accounts at the bottom of the page. Or go to My domains, select your domains, and click Bulk actions > Create mailboxes.
By default, the system suggests creating four mailboxes. To add more, click Add new line at the bottom. Just remember: we recommend no more than 5 mailboxes per domain.
- Enter the sender details – first name, last name, and mailbox name – then select the domains to associate with each mailbox. You can select several at once.
To avoid typing the details for every mailbox, fill in the first row and click the Copy names to empty fields icon. The system copies the information to all empty rows and generates a unique mailbox name for each account. You can edit the names if needed. When you’re done, click Continue.
- In the next window, review the details and click Continue again. The mailboxes appear in your dashboard right away, though activation may take 5–15 minutes.
How to Connect Your New Mailboxes to an Email Outreach Tool
- Export a CSV file with your mailboxes. Choose the format for your tool, such as Instantly or Smartlead. Maildoso offers more than 12 ready-made export formats, plus an Other option for other tools.
- Connect the mailboxes to your chosen tool by following its setup instructions.
- Make sure to enable mailbox warm-up in the same tool. It typically takes at least 14 days. While your mailboxes warm up, you can start building your prospect list with a tool like Apollo.
Why Choose Maildoso?
Maildoso gives you everything you need to set up domains and email accounts. The platform also offers features that make cold email outreach easier and safer.
Automatic IP Rotation. Maildoso distributes emails across multiple IP addresses, so deliverability doesn’t depend on a single one. If one IP runs into issues, the others keep working, and your campaigns keep running.
Automatic Mailbox Recovery. Mailboxes created with Maildoso work in alternating cycles: 14 days of active sending, then 14 days of rest. While one group is paused, the other keeps sending. This gives burned-out mailboxes (the ones whose emails have stopped reaching recipients) time to recover, while the rest stay active.
Link and Image Replacement. Links and images are common reasons emails end up in spam. To reduce the risk, Maildoso automatically replaces them with safer alternatives.
Deliverability and Reputation Monitoring. Warm-up runs through your email outreach tool, but you can check the results in your Maildoso dashboard. The platform also automatically checks inbox placement to see whether emails from your mailboxes actually reach recipients’ inboxes. SMTP mailboxes also come with Google Score and Microsoft Score metrics, which show how much Gmail and Outlook trust your accounts.
With Maildoso, you can get 300 mailboxes free for 30 days – so you can test the infrastructure at real campaign volume before committing to a paid plan.
Final Thoughts
Setting up your email infrastructure with Maildoso is the first step toward launching cold email campaigns. Once your mailboxes are ready, connect them to a sequencer and start warming them up. While warm-up is in progress, build your prospect list and verify the email addresses.
Before launching, calculate your budget, including the costs of mailboxes, domains, lead generation, and email outreach tools. These guides will help you get started:
→ How to Calculate the Cost of Launching a Cold Email Campaign
→ How to Build a Prospect List in Apollo
Not sure if Maildoso is right for you? Book a demo and talk to an expert who can walk you through the platform’s features and help you choose the right solution.
FAQ
Can I automate mailbox and domain creation?
Yes. Maildoso’s API and MCP server let you register domains, create mailboxes, and configure SPF, DKIM, and DMARC records programmatically, then export the mailboxes to your email sequencer. You can even automate the entire setup with an AI assistant such as Claude. It makes scaling your infrastructure easier and faster as your prospect list grows.
Why do I need so many mailboxes?
Multiple mailboxes let you spread your campaigns evenly instead of overloading individual accounts. Email providers may block mailboxes that send too many emails in a short period. To help your emails reach the inbox, we recommend sending no more than 15 emails per mailbox per day and using no more than five mailboxes per domain. The more mailboxes you have, the more you can send overall – while keeping your sender reputation safe.
We already have corporate email accounts. Do we really need separate mailboxes for cold email outreach?
Yes. Recipients may report cold emails as spam, and that can damage your domain’s reputation. If your primary domain loses its reputation because of spam complaints, all your company’s emails – from sales proposals to invoices and partner correspondence – may start landing in spam. Restoring deliverability can take months. That’s why cold email campaigns are typically sent from separate domains: they protect your primary business email from deliverability issues.
Why is mailbox warm-up necessary, and how long does it take?
If you suddenly send hundreds of emails from a brand-new address, email providers may flag it as suspicious and block the mailbox or send your emails to spam. Warm-up prepares your mailboxes for outreach by gradually increasing email volume over time. That builds your sender reputation and lowers the risk of deliverability issues. We recommend allowing at least 14 days for warm-up before launching your campaign.
A note on deliverability
Your copy and targeting only get you so far; the mailboxes you send from decide whether your emails actually land. On cold, misconfigured domains, even the best outreach ends up in spam. Maildoso provides SMTP mailboxes designed for cold outreach, ready to connect in about 3 minutes and starting at just $0.49 each. Domains are purchased separately. Mailboxes are not pre-warmed and require at least 14 days of warm-up before cold campaigns begin.
And with Maildoso’s API and MCP server, you can automate domain and mailbox provisioning and plug it straight into your existing stack and AI workflows.